WordPress to Gatsby
Hey! Just so you know, this article is over 2 years old. Some of the information in it might be outdated, so take it with a grain of salt. I'm not saying it's not worth a read, but don't take everything in it as gospel. If you're curious about something, it never hurts to double-check with a more up-to-date source!
This blog post is a step by step process on how I have imported my WordPress website data to one of the most popular static site generator, Gatsby.
Before We Get Started!
Let us Define Some of the Technologies Being Used
Our Backend
#WordPress
#I assume many of you in the room know what WordPress is. However, for those who need a recap, WordPress is an open source CMS (Content Management System).
It's super popular, and used in a large portion of all sites on the web. There is some crazy figure out there like WordPress runs 32% of the entire internet is often thrown around.
Headless WordPress
#WordPress setups often involve a theme which provides front-end and back-end files to render webpages.
Instead, in this blog post we are going to be creating custom API endpoints in our WordPress theme and importing that data to Gatsby to render pages.
Essentially using WordPress as only a backend. I want to make this clear distinction that whilst WordPress is great for a large portion of general client sites and handling of data. We are not going to be solely relying on traditional PHP or Twig files to generate our pages.
Gutenberg
#For anyone using WordPress, I assume you know what Gutenberg is.
For better or for worse.
Gutenberg is the default content editor for WordPress as of 5.0.0I know it has its issues. However, I think the block building experience is here to stay.
Advanced Custom Fields (ACF)
#ACF is a must have for any developer looking to improve their themes.
ACF allows developers to add custom fields (who'd have thought?) to posts and pages on a WordPress site Not only this but as of ACF 5.8.0 (We are using a beta build) you can now attach custom fields to Gutenberg blocks.
Our Frontend
#React
#React is a popular javascript framework, often compared to Vue and Angular.
The concept in React is to create files as 'Components' and then import them into one another when required. The syntax is at first intimidating but you will build pages with HTML, JavaScript and sometimes CSS (another hot debate).
Styled Components
#Styled Components is an NPM package you can import into React that will allow you to define your CSS/SCSS within a component file. Essentially allowing you to keep all code related to a component in one neat file.
As well as this, any data your component has access to, you can pass into styled components to render new CSS on the fly.
Gatsby
#Gatsby is a static site generator that can generate static HTML files from data imported into the framework.
The final result is that which encompasses all of the latest and greatest available in React tooling with an old-school feel of hosting a site made up of HTML, CSS and JS files alone. As Gatsby is a fresh technology, many developers are opting to search for new CMS alternatives to WordPress which are compatible with Gatsby.
Either that or they are completely rebuilding their sites in markdown files.
I'm in favour of porting existing technologies to improve client usability and reduce the cost of embracing new technologies.
Netlify
#Netlify is one of the most delightful hosting platforms available.
Netlify is one of the most delightful hosting platforms available.
Even better, it's completely free to get started with hosting static sites, it'll even automatically build and deploy our site when changes are made to our repositories.
All Together
#Still With Me?
Don't be put off!
I know we've covered a few different technologies, but this talk is a step by step process. If you have any questions throughout the talk, I'll be taking a 2-minute break to answer questions on the backend and then a couple of minutes in the end to discuss the complete walkthrough.
The Task
#I had set myself a task, to rebuild my personal website https://whatjackhasmade.co.uk (This current website)
I thought this would be a great excuse to tidy up my MVP version of my website, as well as take some time out from client requirements.
Designs
#I'm a big fan of atomic design, for anyone unfamiliar atomic design is a concept of looking at pages and slicing them into smaller and smaller components. Brad Frost is the dad of Atomic Design so I highly recommend checking out his material if you want to learn more.
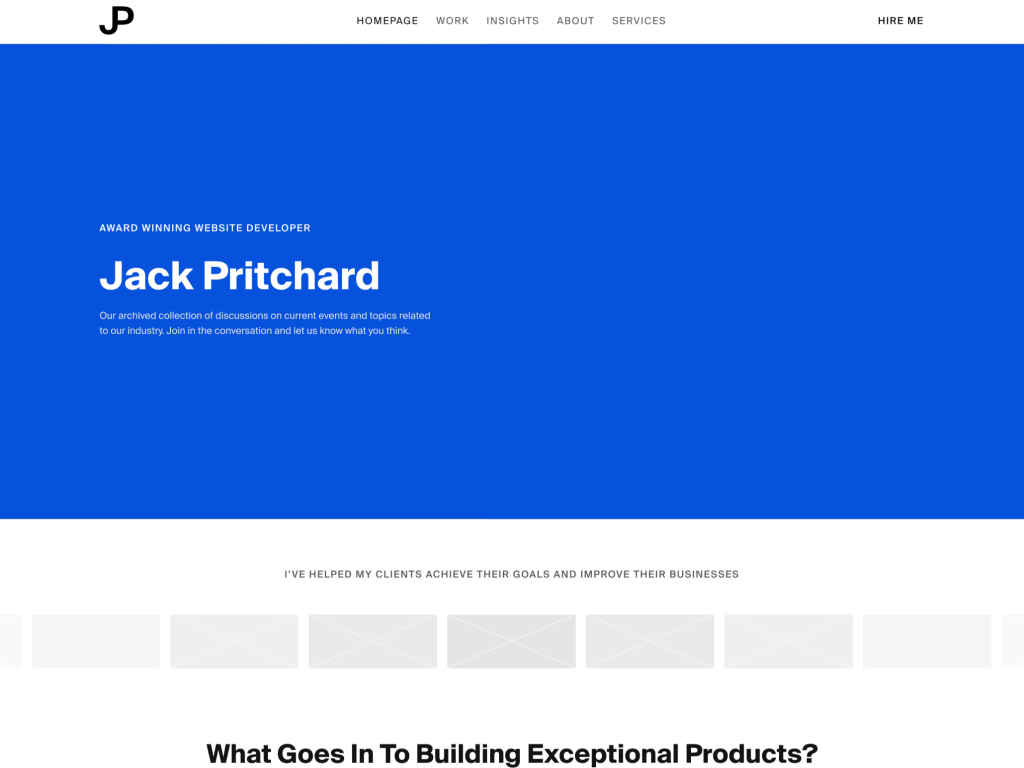
Initial Homepage Design
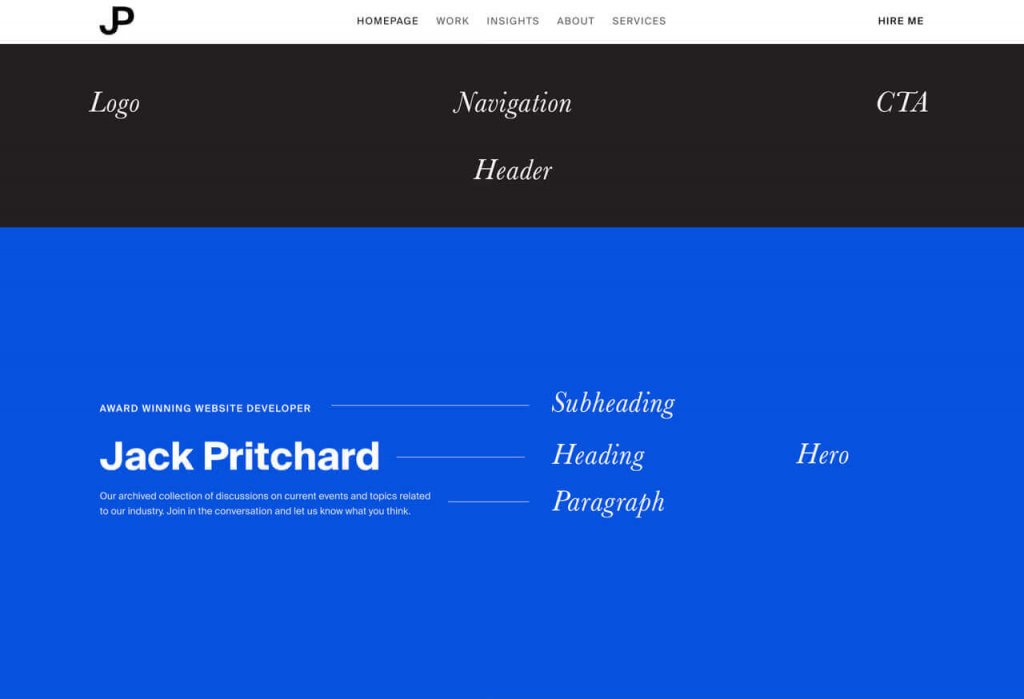
Homepage - Dissected
Development Time
#WordPress
#All we need to know is that we are running version 5 or above.
My WordPress environment is hosted at https://wjhm.noface.app on a shared hosting platform with PHP available.
WordPress Plugins - Minimum Requirements
#The only plugin we need to follow this process is ACF 5.8.0 Beta 3.0. Installing Beta 4.0 introduces breaking changes to how repeater fields are output in my process.
When ACF 5.8.0 gets an official release I'll work on tweaking the process.
WordPress plugins - My Setup
#- ACF 5.8.0 Beta 3.0
- Enhanced Media Library
- JAMstack Deployments
- Timber
- TinyPNG
- WP Migrate DB Pro
- WP Migrate DB Pro (Media Add-on)
- Yoast SEO
WordPress Theme
#To kickstart the WordPress theme, I've downloaded and installed the Timber Starter Theme.
Feel free to download my theme repository as a starting point and alter as you need to - https://github.com/whatjackhasmade/WJHM-Wordpress-Theme
I've made a few alterations to the code but we'll dive into that in a moment.
So far the setup is pretty standard, if you are unfamiliar with Timber, then you should in theory be able to do this without Timber.
The only alterations you will need to make is in how you register your Gutenberg blocks.
To keep the focus on a Headless WordPress build, I have for this project scraped all twig file templates and their components.
What we are left with
#So we've got our WordPress environment up and running, but with no template files we are left with a blank white screen. No HTML is being output in our WordPress site.
So if we have no theme outputs, how are we going to build a website?
Well, we actually do have an output. It's just not HTML!
If you visit - https://wjhm.noface.app/wp-json/wp/v2/posts/
You can see that we have a large JSON output. This is a REST API endpoint which allow for Create, Read, Update and Delete (CRUD) functions to your WordPress setup.
WordPress REST API
#Support for the WordPress REST API has been part of the project's core since version 4.7.0. It opens doors as front-end frameworks are exploding in popularity.
If you have a website running on WordPress 4.7.0 or higher then I invite you to try going to `YOURSITE.com/wp-json/wp/v2/posts'and see what you can find!
With this new endpoint you can now adopt WordPress to work fairly seamlessly with any of your preferred development workflows.
Headless WordPress
#So this is where the concept of headless WordPress comes into play.
We are using WordPress as a content management system only. Displaying data that we can digest in whatever language we want.
As long as it accepts JSON!
How far can you get with the existing API?
#You can get pretty far in what you want to achieve with the existing API.
However, there are a few issues I have with the endpoints -
- Bloated - The endpoints were built to include as many use cases as possible, as a result, it is bloated with meta information I don't need
- Limitations - You are limited to 100 results per page (I have over 200+ blogs I want to query without passing in several endpoints)
- Missing Data - I would love to get access to some ACF or Yoast SEO information from the endpoints but these are currently setup without plugins in mind
- Built to Set
- The API is great for setting HTML but I want to generate new HTML with the information from the API, not just set the content in a wrapper
Creating Our Endpoints
#Fortunately, you can hook into WordPress and create your own endpoints.
I've got a whole blog post about it on my company site -https://noface.co.uk/rest-endpoint-wordpress-menus
To save ourselves some time, I won't go into too much detail as we could literally have a whole blog post on creating endpoints.
That being said, I'll give you a quick overview.
- Before we generate our API data, we need to register the endpoint
- First we hook into the 'rest_api_init' hook
- Next we register the route, this will be our slug for the endpoint"
- As Gatsby will only be importing data, we set the method to GET
- The callback function we'll be defining in the next slide
- Finally, we can accept some arguments, in my own setups I will use a slug parameter for specific page/post querying
Callback Function
#- We're going to create the callback function we just mentioned for our rest endpoint.
- The function will kick off with a WP Query for all published posts
- If the loop returns any results, we'll add them to an array of insights/posts
- We'll then return the array of posts at the end of the function
and there's our endpoint generated at - https://wjhm.noface.app/wp-json/posts/v2/all
Custom Endpoints
#Old Endpoint - https://wjhm.noface.app/wp-json/wp/v2/posts/
Our Endpoint - https://wjhm.noface.app/wp-json/posts/v2/all
Now we have our endpoints, let's move onto creating some content
Revisiting Our Atomic Designs
#Now before we go ahead and develop a building block, let's first pick the block we want to build and break it down. One of my favourite components for a website is a hero component, so let's stick with that.
We are focusing on the Hero component
Atoms That Create The Hero
#In the hero component we have a few parts of data that will be editable.
- Background Colour
- Subheading
- Heading
- Paragraph
Now the list could continue with data such as height, font-size, text colour, etc. But I don't want all of those things to be fluid, I only want the text and background colour to be customisable on a per hero basis.
Mapping the anatomy of the Hero
#To simplify the block even further, as I am the only content editor, I am going to make the hero component require two fields.
- Background Colour (ACF - Colour Picker)
- Content (ACF - WYSIWYG)
Register the block in functions.php
#The current documentation can be found at - https://www.advancedcustomfields.com/resources/acf_register_block/
With Timber documentation on 'acf_register_block' found at - https://timber.github.io/docs/guides/gutenberg/Now the register block documentation is still a WIP and I expect there to be updates in the coming months by Elliot (ACF Founder).
I'll briefly go through my register blocks function -
- First we check the function exists from ACF
- I then create an array for the block names, the icons I want to display in Gutenberg in relation to the block and then merge the arrays
- For each available block, we call the acf_register_block function
- Note the render callback function
- The callback function is then rendered on a per block basis
- The callback function could be reduced to one flexible callback function but for now it works
Register the block in ACF
#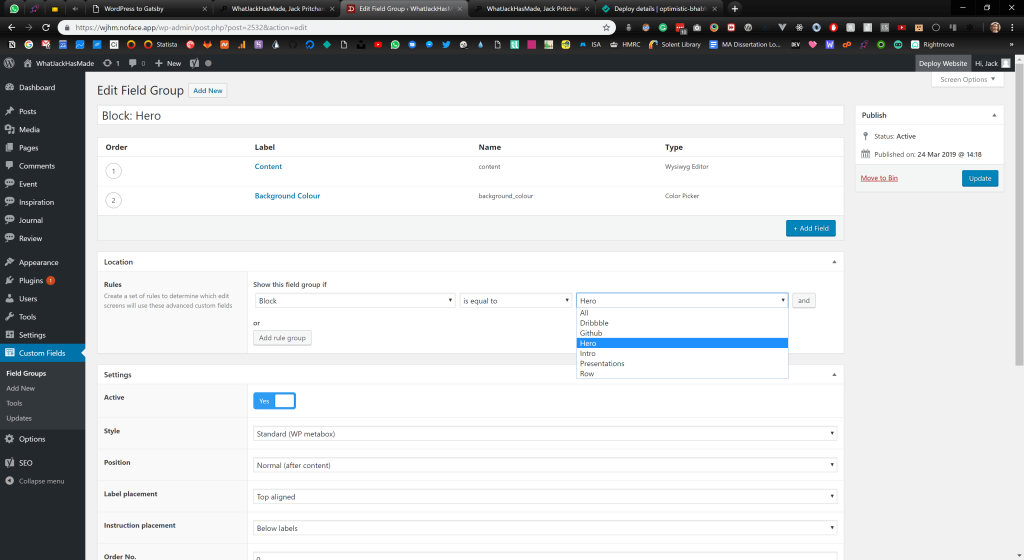
When creating a new field group in ACF, we are able to conditionally load the field group based on the block being inserted into the page.
Creating The Twig File
#As you may have noticed when registering the hero block, we can render a .twig file with the contents of the fields.
I HIGHLY recommend including this for a clients site, as it will give them immediate previews of what the new content will include on the final site.
Otherwise you'll get confused clients asking why Jack has asked you to make a white screen.
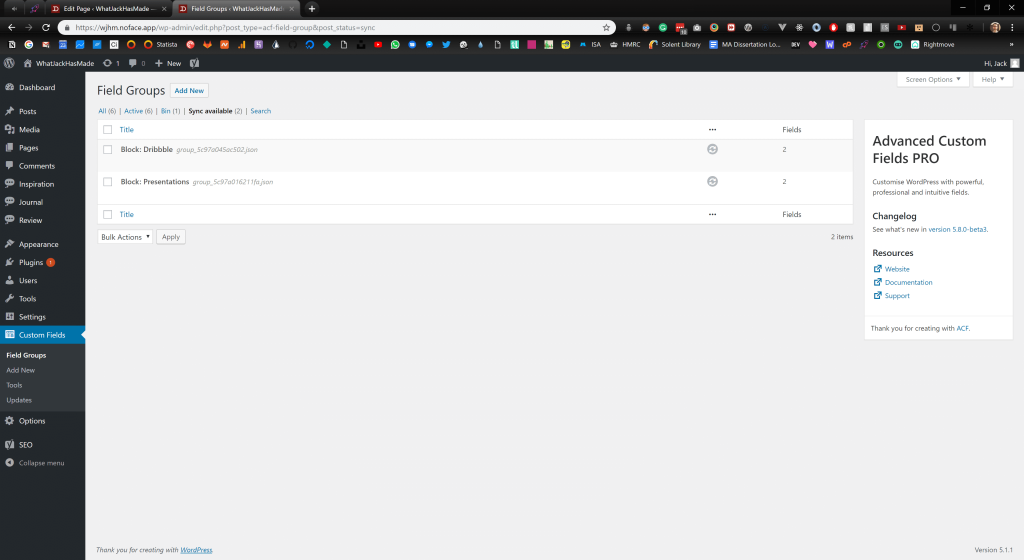
Protip: acf-json folder
#Quick protip, if you are an ACF Pro plugin user, creating a folder named 'acf-json' in your theme directory will save any configurations of your custom field groups to the theme.This is great when working locally and then deploying via version control.
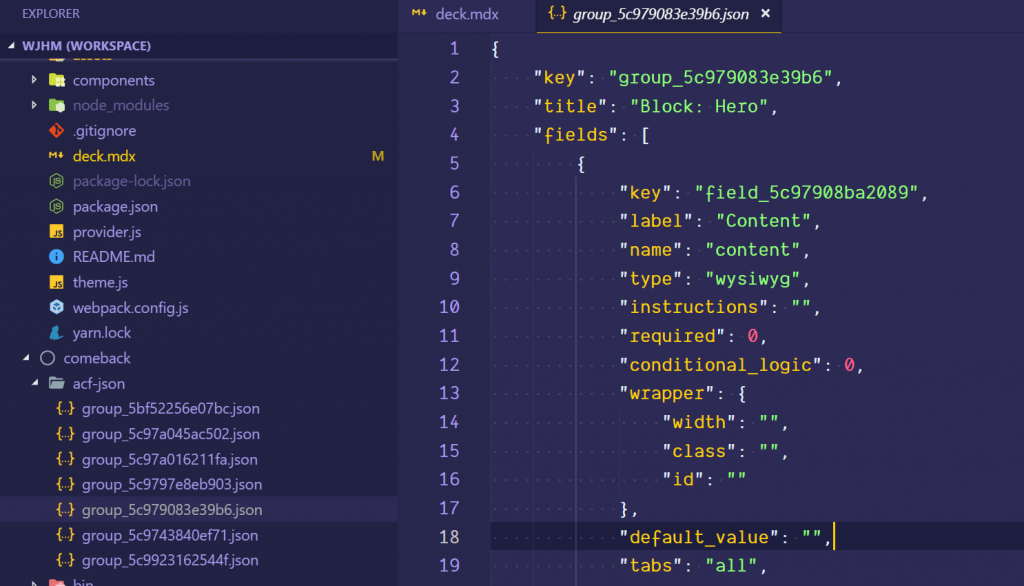
Our Hero block fields in the form of auto-generated JSON, thanks ACF <3
Push this to your online WordPress environment
#With continuous integration, my new block will be registered when I deploy. Then I simply sync the ACF changes on the live site to grab the fields it expects.
If you're ACF fields are out of sync, you can sync the fields based on the auto-generated JSON files provided by ACF.
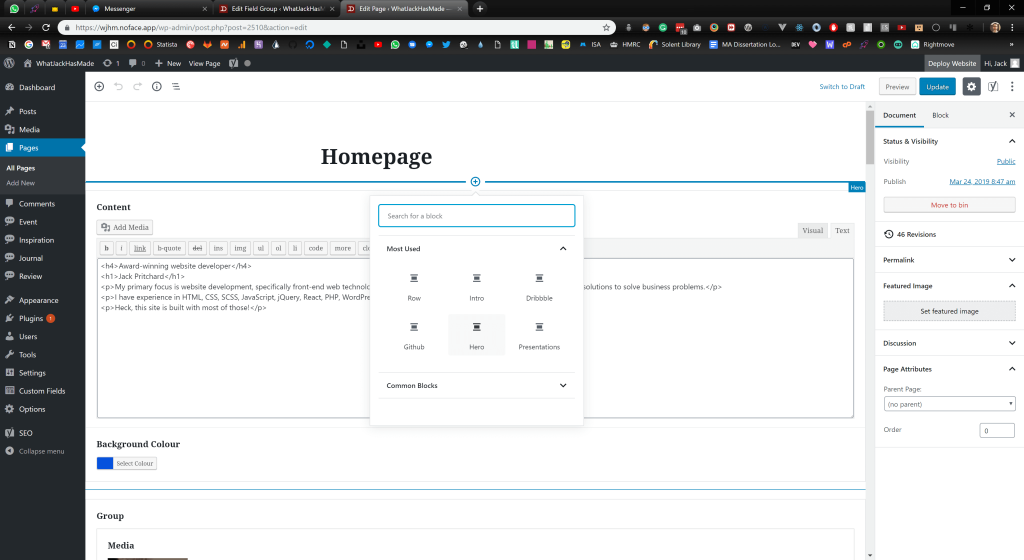
The Hero Component in Gutenberg
#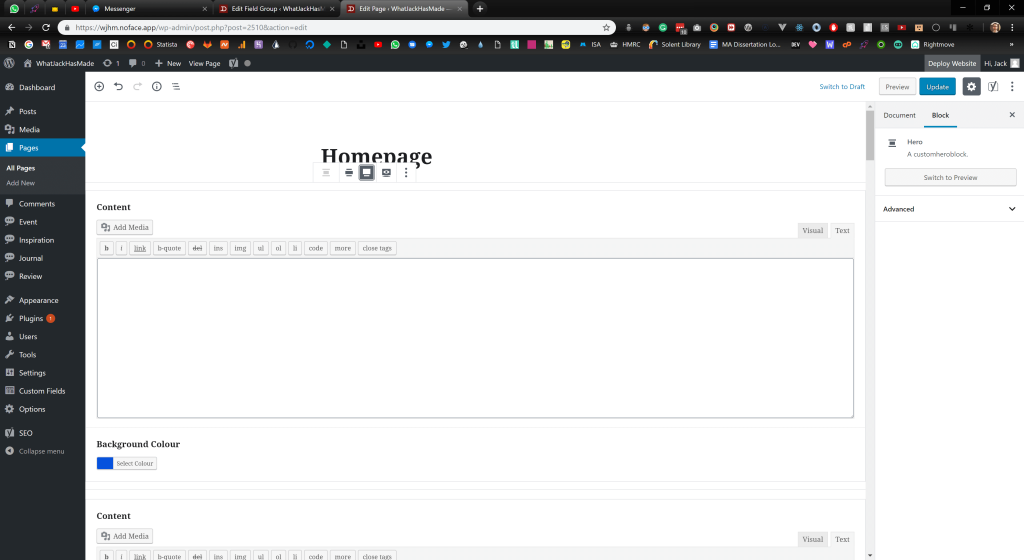
Adding the hero block to a page
This is what we are left with, a new Hero block component.
The layout is a bit hit and miss depending on what fields you include and how many you include, but it's a great start for ACF and registering blocks!
Magic!
#It's like magic! This is something to get excited about for all your WordPress projects. Even if you aren't interested in React, Gatsby or the front-end portion of this blog post.
So far so good?
#We've registered our custom block and it renders nicely in our backend. The only issue is that the block doesn't solve the problem I have when it comes to pages.
The blocks are great at generating HTML in our endpoints, but I don't want that, I want to generate HTML and CSS in our React application.
I want the endpoints to act as a list of ingredients, not cook the meal.
This is fine for posts as I don't want to be creating blocks for a blog post. But when creating pages, I want full access to the blocks properties to use them as props in React.
This is what I'd like in an ideal world.
An array of gutenblocks and their properties.
Converting the content to JSON objects
#I've created the following PHP functional files -
For the most part, they are ugly PHP functions that get the job done. When broken down the PHP code is doing the following -
- I first use find and replace functions to update absolute paths.
- Next, I am converting the field ID's their respective names (Background Colour, Content, etc.)
- The converting continues with replacing the original IDs in the object with the found names
- After that, I use the parse_blocks function to convert the strings of Gutenberg blocks into an array of objects.
- Finally, I believe I've started to make progress on converting images from their IDs to their full-size URL and generating an array of the available crop sizes
- The new content is a structured JSON object with the name of the block, and data associated with the block (content and background_colour fields).
Frontend
#Right let's get into the front-end of the website. This portion of the blog post is heavily decoupled from WordPress but we will be using all of the data we've setup previously.
React - Recap
#Just to recap, the front-end will be built with Gatsby which is completely dependant on React. I won't go too much into React and how to get started, for the most part, if you have NPM or yarn on your machine, you'll be fine setting up a new gatsby site.
Gatsby - Overview
#As of writing this Gatsby is now in version 2 of it's release.
It's free to download and get started, and the starter documentation can be found on their site - https://www.gatsbyjs.org/docs/quick-start/
If you want to follow along with my site example, download the repository from - https://github.com/whatjackhasmade/Don-t-call-it-a-comeback
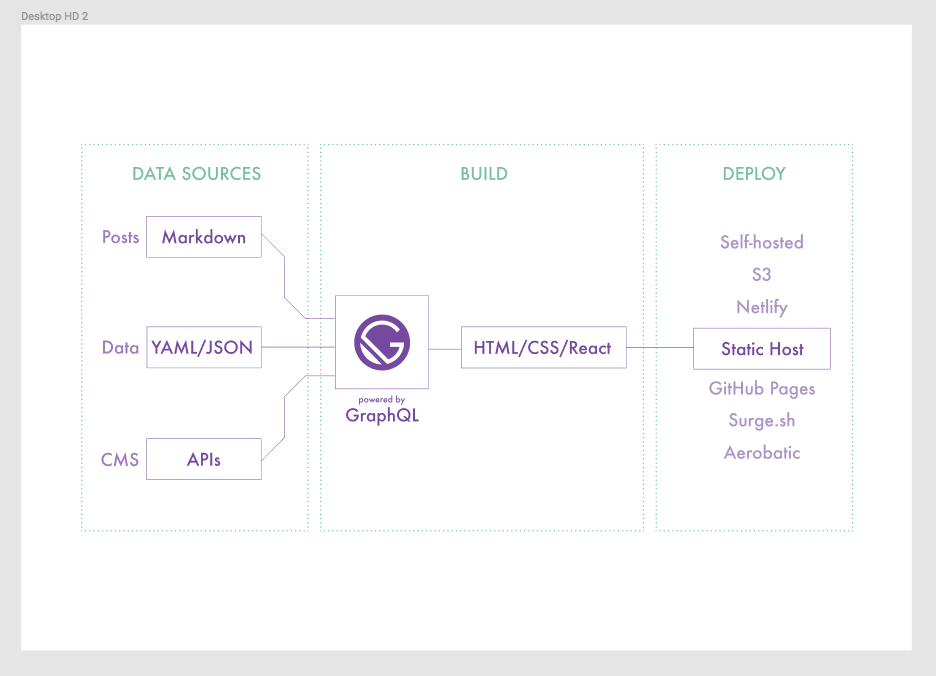
Gatsby workflow diagram
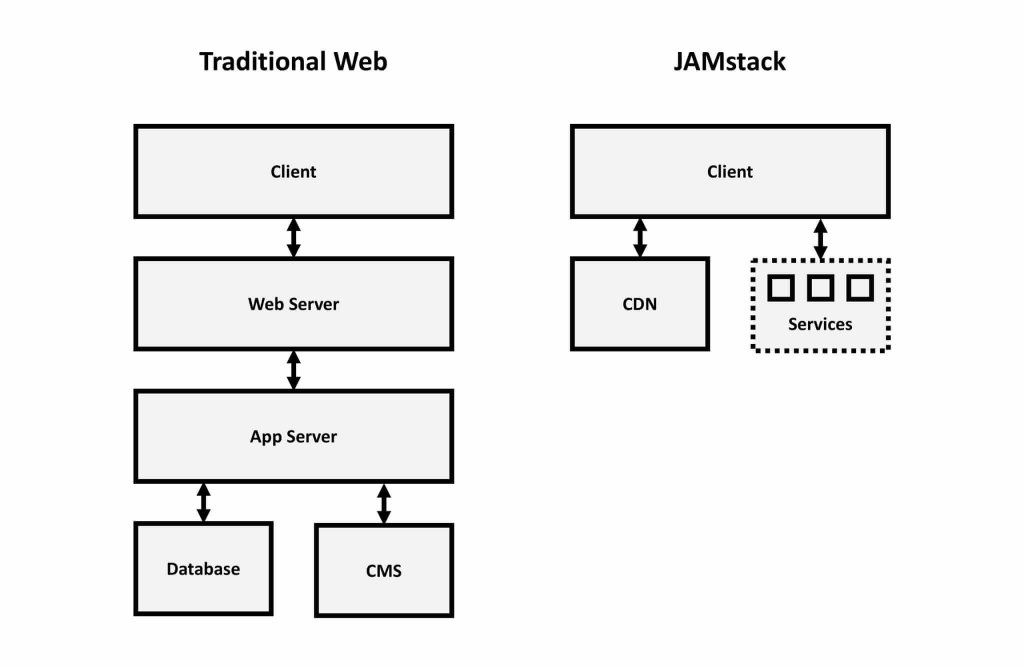
Gatsby vs Traditional server
Benefits of Gatsby
#- Hot reloading
- Enables an offline first approach
- No need for heavy queries
- No need for server queries
- Too much to list in one slide
Gatsby Plugins
#If we look again at the diagram of Gatsby's rendering process, you'll see that we have some form of data input for Gatsby to process.
To gather the data, one of Gatsby's open source plugins can be plucked from their directory and installed via NPM and the gatsby-config.js file in our site root directory.
There are existing plugins for WordPress data, but I prefer to create my own.
Creating our Gatsby WordPress plugin
#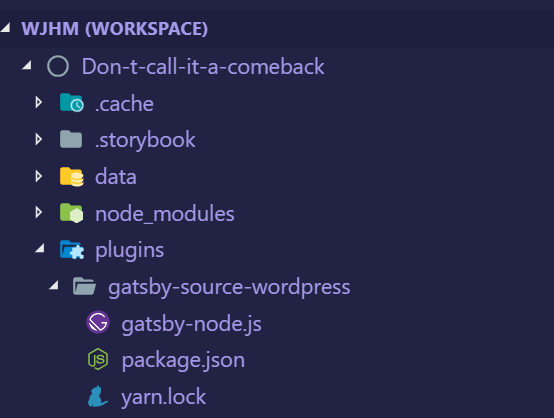
Our WordPress Gatsby plugin
gatsby-node.js
#- First I've imported a few NPM packages to help with handling any data
- We kick things off with a function which Gatsby provides us for generating data, accessible via Gatsby
- As a source of data, I am using my WordPress endpoint and performing a fetch request to pull down the JSON
- When the data is available, we are then processing the data as 'nodes' in Gatsby
gatsby.config.js
#Firing up our Gatsby site
#To run the site, you'll need to have terminal access to the Gatsby root folder and run
npm run dev`. Once started, Gatsby will begin preparing assets, data and any other configurations you've set up.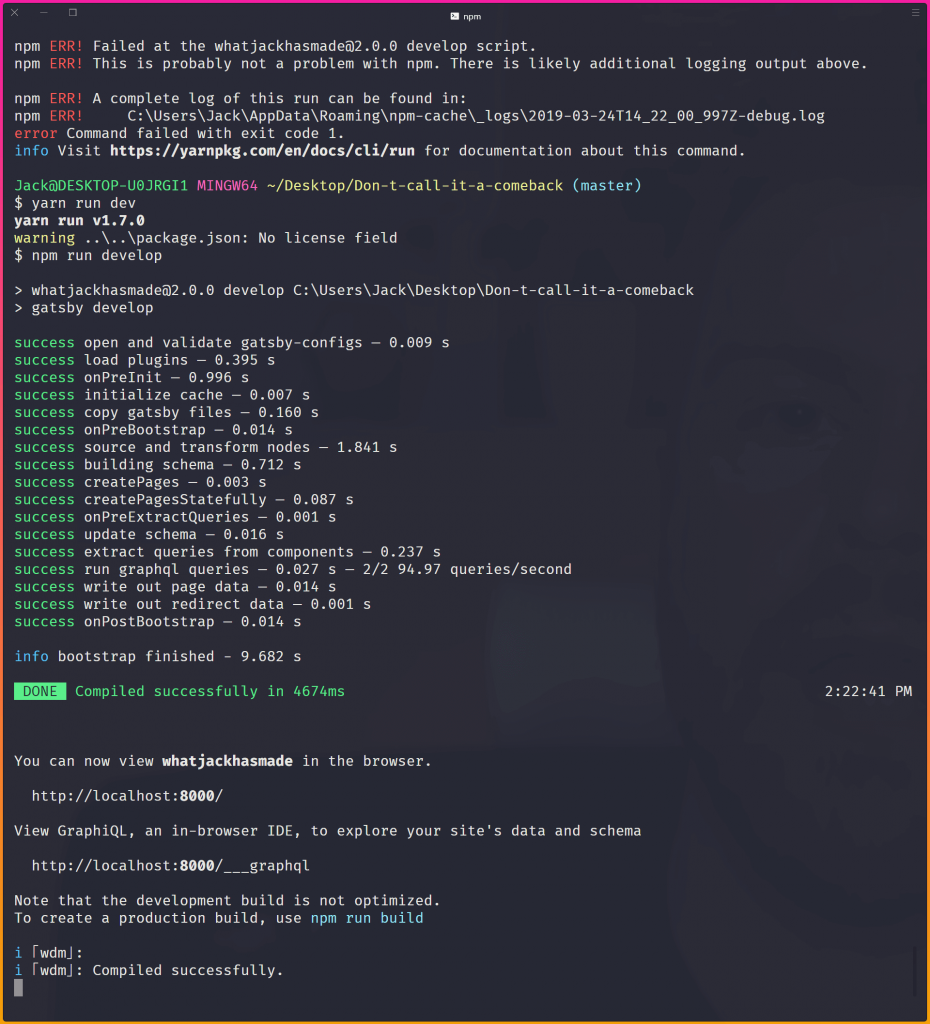
Running Gatsby in our terminal
Access to data via GraphQL
#For most developers, querying data in WordPress is often done in the templating language itself via WordPress functions like the_title(); or get_field();
Other developers may opt to query using SQL statements.
However, with Gatsby we have access to the data in a language called GraphQL.
To query the data Gatsby has access to, we can either pop open their friendly URL which for me is https://localhost:8000/___graphql
GraphQL Playground
#I prefer to use a tool called GraphQL Playground as it has a dark mode which helps with my vision!
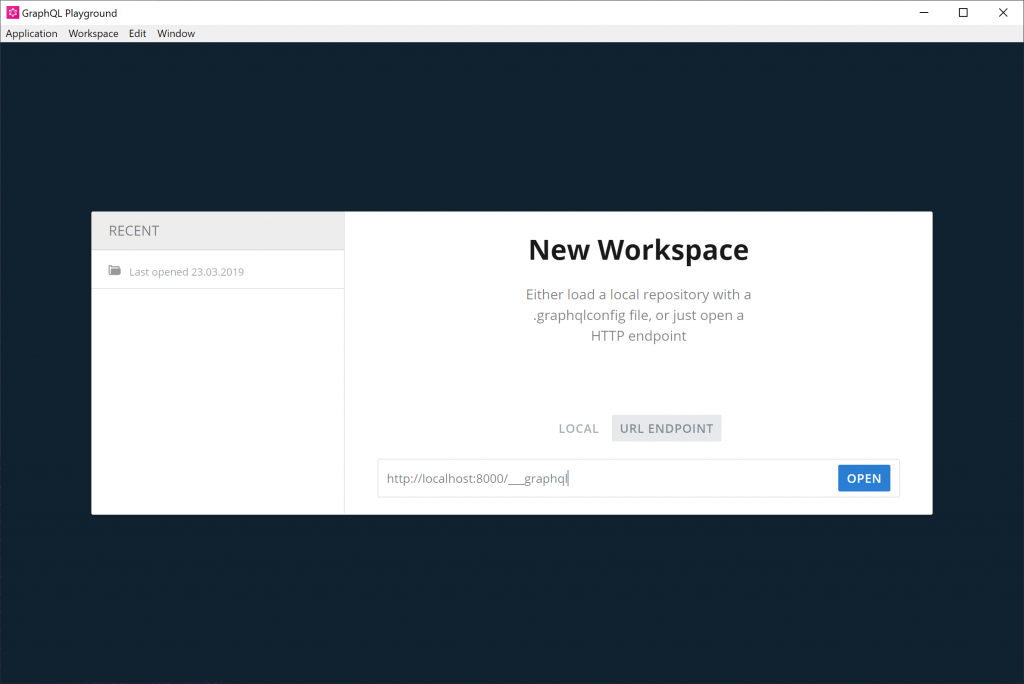
GraphQL Playground
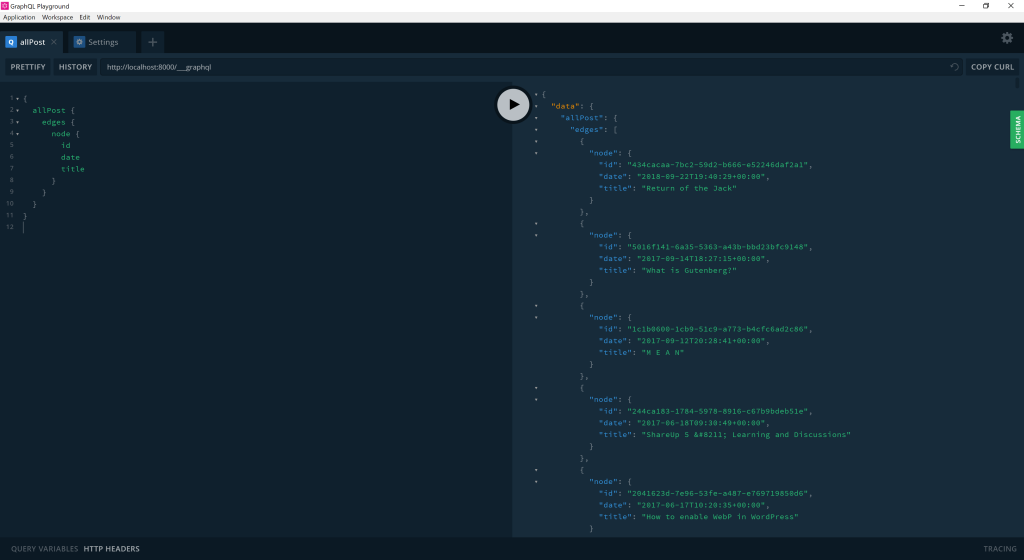
My First Gatsby GraphQL Query
Pages in Gatsby
#Similar to how with basic PHP setups, you can add a new page by adding a
/blog'path on your site.The same can be done in Gatsby's `pages'directory.
Auto-generate pages with JSON and GraphQL
#We'll be skipping that and instead auto generating the pages based on the JSON available at our custom endpoints.
The `createPages'function lives in within our plugin and does the following -
- First we tap in to Gatsby's createPages function and create a GraphQL promise
- Within the GraphQL promise, we create a query to expose all the data available via our Gatsby plugin
- Before writing a query here, I'd highly recommend testing it at
- After the query, we are then looping over each page we find and using the createPage function
- Creating the page this way, allows us to access the data as props later on.
Gatsby page template
#- The page template first imports React and some components I've created to assist with generating the page
- Here I am destructuring the 'content' property from the context we defined in the previous slide
- I then return the page in a Base wrapper with my global styles and pass the content data into a block parser
Sanitizing and rendering components with the data
#The data itself is still simply that, data.
To process the data we need to write some functions which check what type of block is available and then render the correct React component based on that. This is done with my ACFParser block, which is one of the largest files in my project.
- The ACF Parser component first imports React and the hero component
- I then check that the data is valid and has properties to parse
- If there is valid data, I then create an array of the page's components
- I then loop over the array and if the block object has a name which matches a component I've created
- I return the component and pass specific data to the component to use in the render method
Our React Hero Block/Component
#If the parser detects the name `acf/hero'which we have in our endpoint then it will import that component with all of the layout, styles and logic related to it.
- To kick things off, we import React and Styled-Components
- Within the component rendering, we are then destructuring the data we passed in from ACFParser
- Then we return the HeroComponent constant with the content we've passed down
- Next I define a constant for the HeroComponent element, which uses the properties we've just passed in the render method
- If no background data is passed, we fallback to the hex colour blue
- The two data fields we are importing are the background colour of the hero, and the WYSIWYG content.

Our rendered hero component in Gatsby / React
Styled Components
#The hero component is a great example of how it can be used effectively.Remember way back at the start of this blog post I said we were using Styled Components?
Simply changing the background colour value in WordPress means that we have updated the prop set in our component on render.
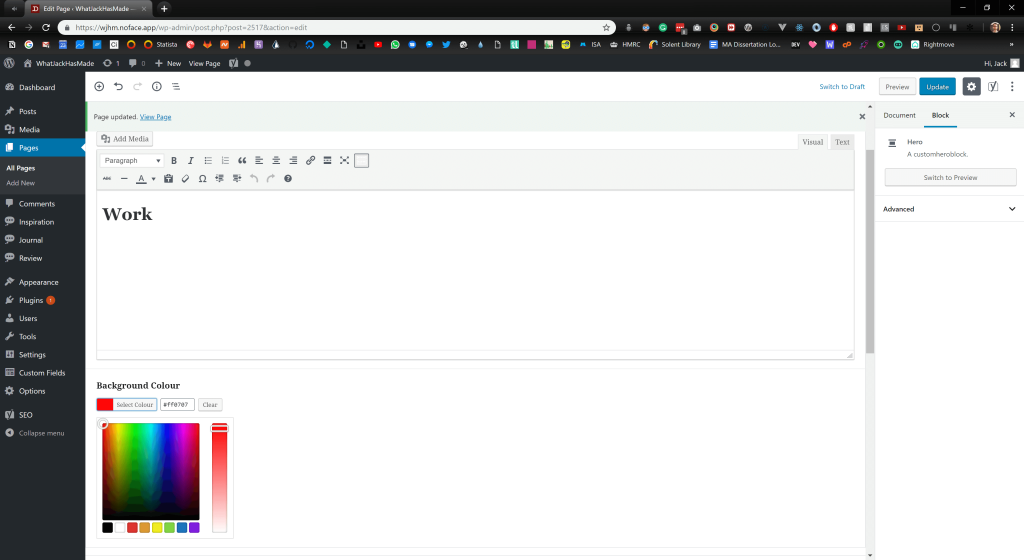
Adding a red background colour to our hero in the WordPress editor

Reflected colour change on the front-end
Building our pages
#All that is left now is to start creating content in WordPress to be digested by Gatsby.
Things to be aware of
#During development, Gatsby only has access to data imported on the time of
npm run dev`.If you create new pages or add content to WordPress, restart your local server.
Creating Future Components
#- Register block - Functions
- Register block - Twig (Optional)
- Register block - ACF
- React Component
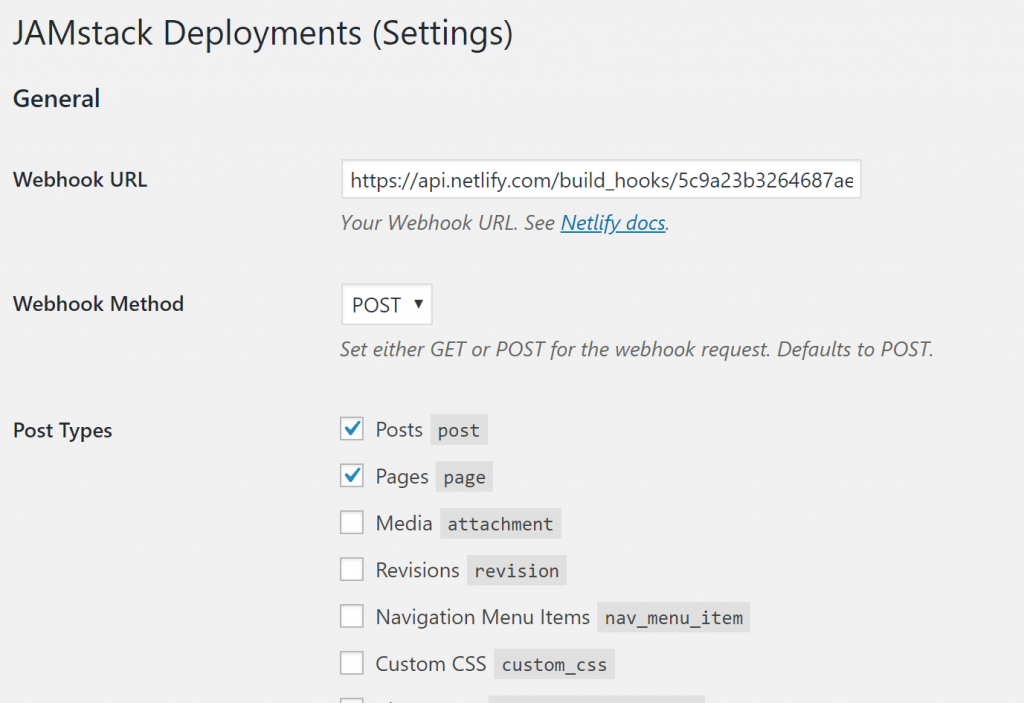
Hooking Netlify Up
#So now we have a static site being generated. It's time to get this bad boy live for the world to see.Hooking Netlify Up
https://app.netlify.com/ are a great hosting solution as again it's FREE and they continously deploy on repository changes, warn you of insecure code references (HTTP vs. http).
Generate on Content Changes
#https://github.com/crgeary/wp-jamstack-deployments
That's all folks
#Thanks for letting me ramble, there may be a few points I had to trim out for the sake of your time, so if you have questions you want to ask, then please do tweet me and I'll try my best to answer!